7 Proven Solutions: Why Your Top Freezer Is Not Freezing (2025) ❄️
November 14th, 2025
Introduction
Is your top freezer failing to keep food frozen solid, putting your groceries at risk? Without quick action, you could lose hundreds of dollars in spoiled food or face costly emergency repairs exceeding $800. In this guide, you’ll discover the 7 most common causes of freezer failure and learn which fixes you can handle yourself in under two hours, potentially saving $300-600 on service calls.
Quick Diagnosis: What’s Really Wrong?
Before diving into repairs, identify your freezer’s specific symptoms:
Problem indicators:
Food items are soft instead of rock-solid
Ice cream has soupy consistency
Freezer reads above 10°F (ideal is 0°F)
Excessive frost buildup on walls
Complete silence for 30+ minutes
Continuous running without cycling off
Safety First:
ALWAYS unplug before touching components
Wait 5 minutes for capacitors to discharge
Wear safety glasses and insulated gloves
Never use heat guns on ice buildup
Tools needed:
Digital multimeter ($25-45)
Screwdriver set ($15-30)
LED headlamp ($12-25)
Flashlight
7 Proven Solutions
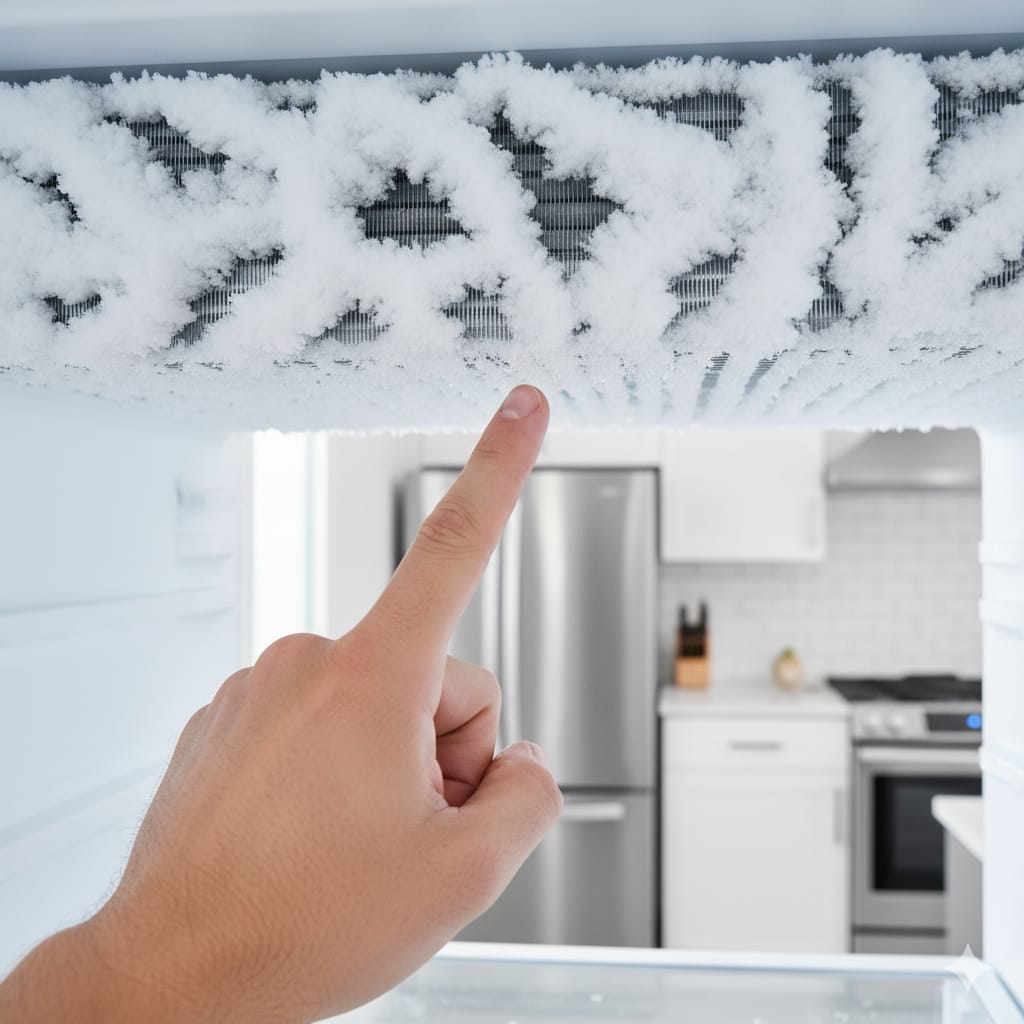
Solution #1: Frost Buildup & Poor Airflow ⭐⭐⭐⭐⭐
Likelihood: Very Common (30-40% of cases) Difficulty: Easy Time: 2-6 hours Cost: $0-25
Symptoms:
Thick frost coating (more than 1/4 inch) on walls
Ice around evaporator fan cover
Reduced airflow from vents
Fix:
Remove all food and store in coolers
Unplug refrigerator completely
Place towels around base
Leave door open and use fans to accelerate melting
Place bowls of hot water inside
Wait 4-8 hours until ALL ice melts
Wipe surfaces and clean drain hole
Plug back in and wait 2-4 hours before restocking
Pro tip: If frost returns within 2-3 weeks on auto-defrost models, the defrost system needs testing.
Solution #2: Overpacked or Underpacked Freezer ⭐⭐⭐⭐
Likelihood: Common (20-25% of cases) Difficulty: Easy Time: 20-30 minutes Cost: $0
Symptoms:
Uneven freezing throughout compartment
Items in front of vents freeze while others don’t
Blocked air circulation
Fix:
Aim for 70-85% full (optimal loading)
Keep 3-inch clearance from all vents
Remove excess items or expired food
Store flat items on bottom
Leave pathways for air circulation
If underpacked, add water bottles for thermal mass
Likelihood: Moderate (10-15% of cases) Difficulty: Medium Time: 1-2 hours Cost: $50-150
Symptoms:
No air movement inside freezer
Fridge cools but freezer doesn’t
Ice buildup on fan blades
Test:
Listen for fan noise (quiet whirring)
Access back panel inside freezer
Try spinning fan blade manually (power OFF)
Should spin freely
Electrical test:
Unplug refrigerator
Disconnect fan motor wires (label first)
Test with multimeter on continuity mode
Expected: 200-500 Ω resistance
No reading = motor failed
Fix:
Order replacement fan motor ($40-120)
Remove mounting screws
Disconnect wiring
Install new motor in same orientation
Reconnect wires matching colors
Replace panel and test
Solution #6: Failed Defrost System ⭐⭐⭐
Likelihood: Moderate (10-12% in auto-defrost) Difficulty: Medium to Advanced Time: 2-3 hours Cost: $30-200
Symptoms:
Frost returns within days after defrosting
Freezer works then slowly warms
Components:
Defrost timer ($30-60)
Defrost heater ($25-80)
Defrost thermostat ($15-40)
Test defrost heater:
Access evaporator compartment
Disconnect heater wires
Test with multimeter
Expected: 200-500 Ω
No reading = heater failed
Pro tip: Defrost heater fails most often. Understanding electrical troubleshooting helps with washing machine error codes too.
Solution #7: Faulty Start Relay or Compressor ⭐⭐
Likelihood: Less Common (5-10% of cases) Difficulty: Medium to Advanced Time: 1-2 hours (relay), 3-5 hours (compressor) Cost: $20-80 (relay), $300-600+ (compressor)
Symptoms:
Clicking sounds, compressor won’t start
Compressor hums briefly then stops
Complete cooling failure
Test start relay:
Unplug refrigerator
Remove back panel
Unplug relay from compressor
Shake relay next to ear
If it rattles = failed ($15-40 replacement)
Compressor test (advanced):
Remove relay and overload
Test resistance between pins with multimeter
Should read 3-5 Ω between each pair
Infinite resistance to body
Wrong readings = compressor failed
Important: If compressor failed and unit is 8+ years old, replacement is usually better than repair.
Repair vs. Replace Decision Guide
The 50% Rule
If repair cost exceeds 50% of replacement cost (factoring in age), consider replacing.
Examples:
Repair
Cost
Age
New Unit
Decision
Door gasket
$60
5 yrs
$800
✅ Repair
Evaporator fan
$120
9 yrs
$900
✅ Repair
Compressor
$650
7 yrs
$900
🤔 Borderline
Compressor
$650
12 yrs
$900
❌ Replace
Repair if: ✅
Under 7 years old
Single component failure
Cost under $200
Well-maintained
Replace if: ❌
Over 12 years old
Multiple failures
Cost exceeds $500
Frequent previous repairs
Energy consideration: Modern Energy Star units use 30-40% less energy than 10-year-old models, saving $40-50 annually.
Prevention & Maintenance
Monthly (5-10 minutes):
Check door gasket
Verify 0°F temperature
Inspect for unusual frost
Ensure 70-85% loading
Every 6 Months (30-45 minutes):
Clean condenser coils
Vacuum around unit
Check unit is level
Manual defrost if needed
Annually (1-2 hours):
Deep clean all surfaces
Test temperature accuracy
Professional inspection for 8+ year units
Maintenance ROI:
Time investment: 2-3 hours/year
Cost: $20-30/year
Lifespan extension: 40-60%
Savings over life: $1,200-2,500
When to Call a Professional
DIY-Friendly: ✅
Door seals
Manual defrosting
Condenser coil cleaning
Start relay replacement
Evaporator fan (with tools)
Call Pro For: 🚨
Sealed refrigerant work:
Requires EPA certification
Cost: $400-900
DIY risk: Federal violations ($37,500+ fines)
Compressor replacement:
Needs refrigerant handling
Cost: $400-800 installed
On 8+ year units, replace entire appliance
How to choose technician:
✅ EPA Section 608 certified
✅ Licensed and insured
✅ 5+ years established
✅ Real reviews (Google, Yelp, BBB)
✅ 90-day warranty minimum
Red flags: 🚩
Full payment upfront
No physical address
Cash-only
No licensing proof
Average costs:
Diagnostic: $75-150
Labor: $80-150/hour
Service minimum: $95-200
Frequently Asked Questions
How much does it cost to fix a freezer that’s not freezing?
DIY repairs: $0-200 for most common issues Professional repairs: $150-900 depending on component
Most cost-effective DIY fixes:
Defrosting: $0
Door gasket: $40-80
Start relay: $15-40
Evaporator fan: $50-120
Can I fix this myself?
Yes, for 60-70% of common problems. Easy fixes include defrosting, cleaning coils, reorganizing, and replacing gaskets. Moderate difficulty includes fan motors and defrost components. Leave compressor work and sealed systems to professionals.
How long should a top freezer last?
15-20 years with proper maintenance, though performance may decline after 10-12 years. Factors include maintenance frequency, usage patterns, and ambient temperature.
Why does my freezer work sometimes but not others?
Intermittent issues usually indicate:
Defrost cycle problems
Failing start relay
Loose electrical connections
Thermostat cycling issues
Compressor overheating
What temperature should my freezer be?
0°F (-18°C) is ideal. Acceptable range: -5°F to +5°F. Above 10°F, food deteriorates faster. Below -10°F wastes energy with minimal benefit.
Is it worth fixing a 10-year-old freezer?
Depends on repair cost and condition. Repair if under $200 and well-maintained. Replace if compressor failed or repair exceeds $400. Modern units save $40/year in energy costs.
How long can food last if freezer stops working?
24-48 hours with door closed, depending on fullness:
Full freezer: 48 hours
Half-full: 24 hours
Keep door closed to maintain temperature
Transfer to coolers if repair takes longer
Key Takeaways
Remember:
✅ 70% of freezer problems are DIY-fixable
✅ Start with simple solutions (defrost, reorganize, clean)
✅ Door gaskets and start relays are easy wins
✅ Test components before replacing
✅ Call pros for refrigerant work
✅ Replace units over 12 years old needing major repairs
Your Next Steps:
Identify your specific symptoms from this guide
Try the quick fix (Solution #0) first
Progress through solutions by likelihood
Document repairs for future reference
Implement monthly maintenance schedule
Conclusion
You now have a complete roadmap to diagnose and fix the 7 most common causes of top freezer failure. From simple defrosting to component replacement, most issues can be resolved with basic tools and patience. Remember: proper maintenance prevents 70% of failures and extends your freezer’s life by 4-6 years, saving thousands in replacement costs.
Ready to fix your freezer? Start with the simplest solutions and work your way through. Safety first, and don’t hesitate to call a professional for refrigerant system work or complex electrical issues.
Did this guide help? Share your success story or ask questions in the comments. We respond within 24 hours and love hearing how you saved money on DIY repairs!
Need professional help? If your freezer needs expert attention beyond DIY solutions, contact certified appliance repair specialists in your area for same-day service with warranty-backed repairs.
Table Of Contents
newsletter signup
Get expert appliance tips, maintenance guides, and exclusive repair discounts delivered to your inbox
Appliquix connects you with certified local appliance repair technicians across the US, Canada, Australia, and Europe. Fast, reliable, and affordable appliance repairs at your doorstep