
What: Complete installation guide for window AC units in standard, sliding, and apartment windows
Who: Homeowners, renters, and apartment dwellers looking to cool their space efficiently
Why: Proper installation prevents energy waste, water damage, and unit failure while maximizing cooling performance
When: Best installed before peak summer heat (May-June) or immediately when temperatures rise
How: 7-step process using basic tools, mounting brackets, side panels, and weatherproofing materials
Summer heat transforms your home into an uncomfortable sauna, driving up energy costs and making sleep nearly impossible. Every day without proper cooling means higher utility bills, reduced productivity, and potential health risks for vulnerable family members. You need immediate relief, but professional HVAC installation quotes can exceed $500 for what’s actually a manageable DIY project.
This comprehensive guide shows you exactly how to install a window air conditioner in any window type—including challenging sliding windows and apartment setups without traditional side panels. You’ll learn the proven seven-step method that HVAC professionals use, along with critical safety measures that protect both your investment and your home. Whether you’re installing your first AC unit or upgrading to a more efficient model, this guide delivers the confidence and technical knowledge you need to complete the job right.
By following these tested procedures, you’ll achieve professional-grade installation results, save hundreds on labor costs, and enjoy optimal cooling performance all season long.

Before beginning your installation, gather all necessary tools and materials to ensure a smooth, uninterrupted process. Having everything prepared prevents mid-installation trips to the hardware store and reduces overall installation time by approximately 40%.
You’ll need a measuring tape for precise window measurements, a level to ensure proper unit positioning, a screwdriver set (both Phillips and flathead), a power drill with various bits, a utility knife for foam cutting, and safety equipment including work gloves and safety glasses.
Every window AC installation requires the unit’s included mounting bracket and side panels (accordion-style extensions), weatherstripping foam or rubber gaskets, L-brackets or angle brackets for securing the unit, wood screws appropriate for your window frame material, and a window lock or security bracket to prevent the window from opening once the unit is installed.
Consider purchasing an AC installation kit specifically designed for your window type (horizontal sliding, vertical, or casement). These kits include pre-cut panels and foam insulation. You may also want exterior-grade silicone caulk for additional weatherproofing, an outdoor AC cover for off-season protection, and anti-vibration pads to reduce operational noise.
The total cost for tools and materials typically ranges from $25 to $75, depending on what you already own. This one-time investment pays for itself compared to professional installation fees of $150 to $500.
Accurate window measurements determine installation success and prevent costly returns. Approximately 23% of window AC purchases result in returns due to improper sizing, according to home improvement retailers.
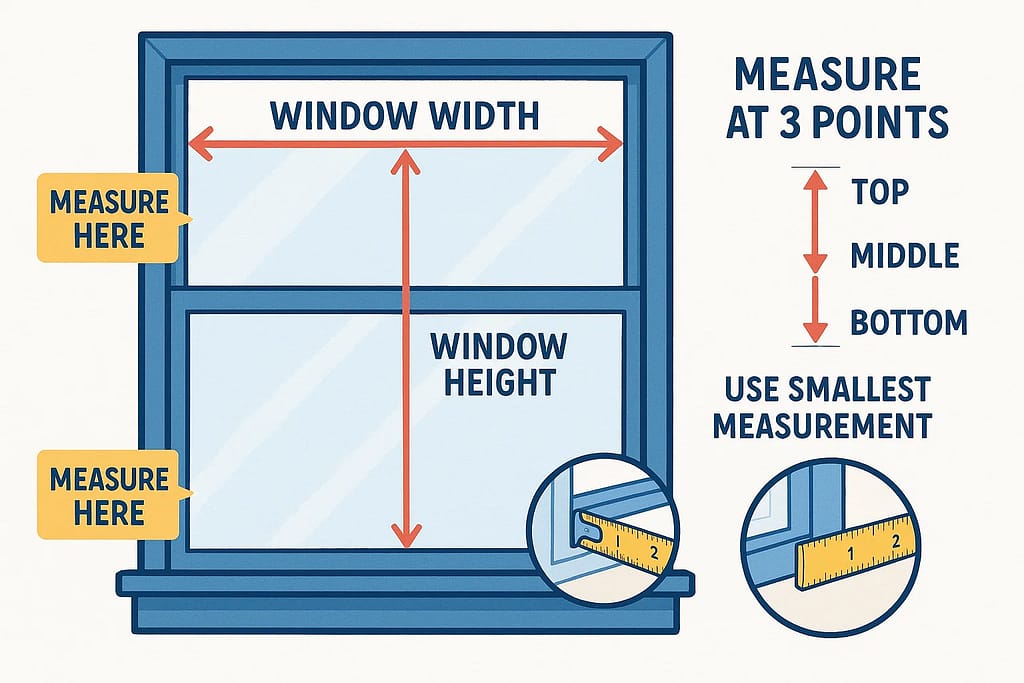
Measure your window width from the inside of the frame (left jamb to right jamb), taking measurements at three points: top, middle, and bottom. Windows often have slight variations. Use the smallest measurement to ensure proper fit. For height, measure from the window sill to the bottom of the upper sash when fully raised.
Window air conditioners specify three critical measurements: unit width (the actual width of the AC chassis), minimum window width required (accounting for side panel extension), and maximum window width (the furthest the side panels can extend). Your window width must fall within the minimum and maximum range specified by the manufacturer.
Standard double-hung windows offer the easiest installation platform, requiring widths between 23 and 36 inches for most units. Sliding windows present unique challenges, often requiring custom side panels or mounting boards. For these installations, measure both the width and the depth of the window track. Casement windows typically cannot accommodate standard window AC units without significant modification or specialized equipment.
Record all measurements before shopping for your unit. Most modern window air conditioners accommodate windows between 23 and 36 inches wide, though compact models fit windows as narrow as 20 inches.
Follow this proven seven-step installation process to ensure safe, efficient operation. This method has been refined through thousands of professional installations and addresses the most common installation challenges.
Clean the window sill and frame thoroughly, removing dirt, debris, and old weatherstripping. Inspect the window for structural damage—wood rot, cracked frames, or loose hinges must be repaired before installation. A compromised window cannot safely support an AC unit weighing 50 to 120 pounds.
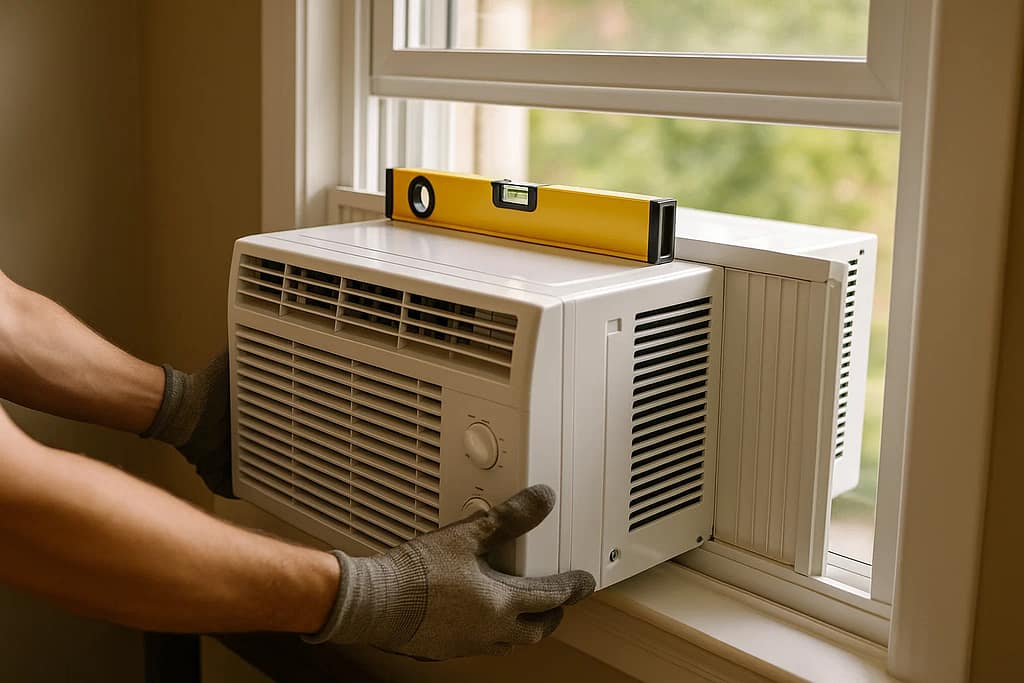
Raise the window sash completely and measure the opening one final time. Install the mounting bracket or support frame according to manufacturer specifications, ensuring it’s level using your spirit level. Most mounting brackets attach to the window sill and extend outdoors to support the unit’s weight.
Position the mounting bracket flush against the window sill, checking that it’s level both front-to-back and side-to-side. Secure it with the provided screws, drilling pilot holes if installing into hardwood frames. The bracket should extend beyond the exterior wall by 2 to 4 inches, providing stable support for the unit’s outdoor portion.
For apartments or rental properties, consider alternative mounting solutions that don’t require drilling, such as tension-mounted support brackets or window frame clamps. These options provide adequate support while preserving your security deposit.
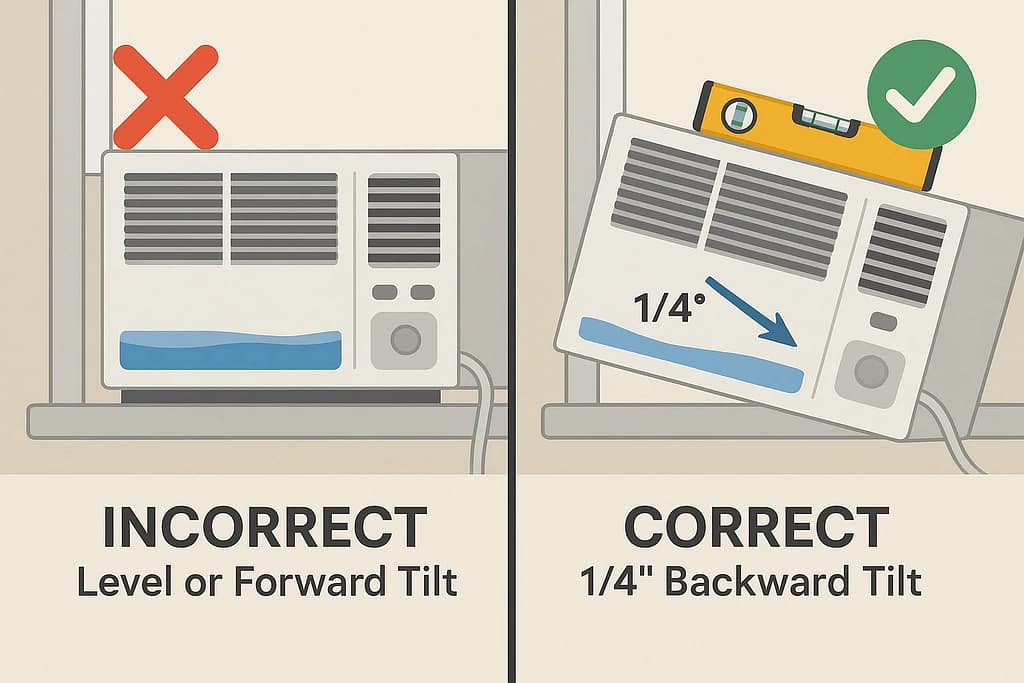
This step requires two people for units over 50 pounds. Carefully lift the AC unit and place it on the mounting bracket, centering it in the window opening. The unit should tilt slightly backward (approximately 1/4 inch over 12 inches) to ensure proper condensation drainage. Use your level to verify this angle.
Slide the unit forward until the front face sits flush with the interior wall or slightly recessed. The outdoor portion should extend past the exterior wall enough to drain water away from your home’s foundation.
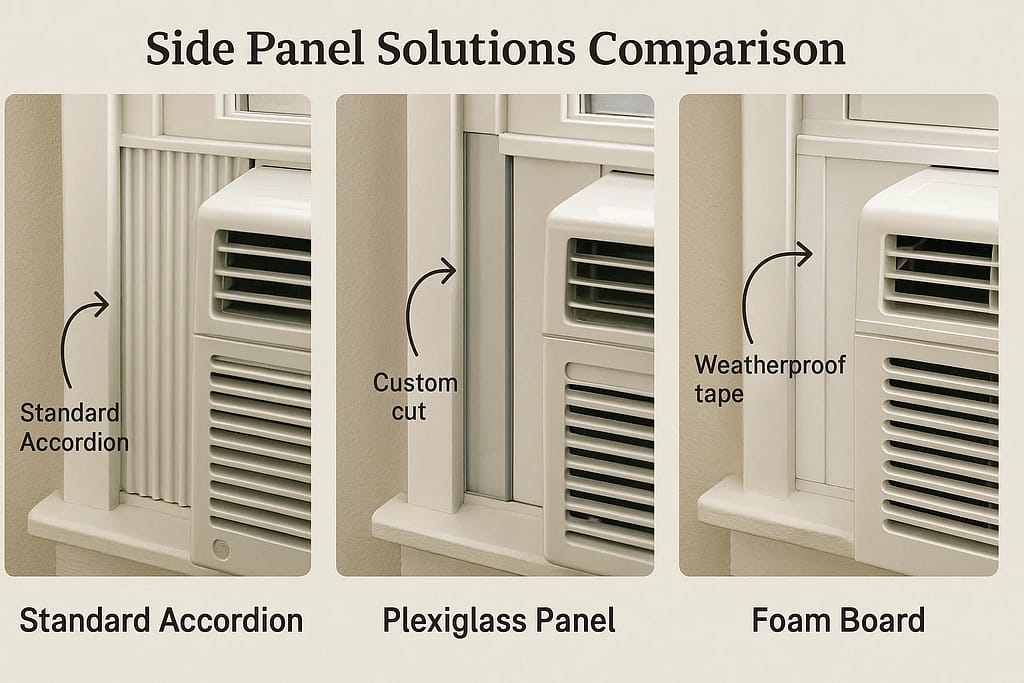
Pull both side panels (accordion extensions) outward until they reach the window frame edges. These panels fill the gaps between the AC unit and the window frame, preventing hot air infiltration. Secure the top and bottom of each panel to the window frame using the provided screws or clips.
For sliding windows or installations without side panels: Cut rigid foam board or plexiglass to fit the gap dimensions. Measure carefully, cut with a utility knife or saw, and secure using weatherproof tape or brackets. This custom solution often provides better insulation than standard accordion panels.
Carefully lower the window sash until it rests on top of the AC unit. The sash should compress the foam weatherstripping (usually pre-attached to the unit’s top), creating an air-tight seal. Insert the provided window lock or L-bracket between the upper and lower sashes to prevent the window from being opened—this serves both as a security measure and maintains proper installation.
Inspect every seam where air might enter: between side panels and window frame, around the window sash, and where the unit meets the exterior wall. Fill these gaps with foam weatherstripping, ensuring complete coverage. For larger gaps exceeding 1/2 inch, use expanding foam insulation or cut foam board to size.
Apply weatherstripping along the bottom edge where the window sash contacts the AC unit. This step is critical—inadequate sealing reduces cooling efficiency by 15% to 30% according to Department of Energy testing.
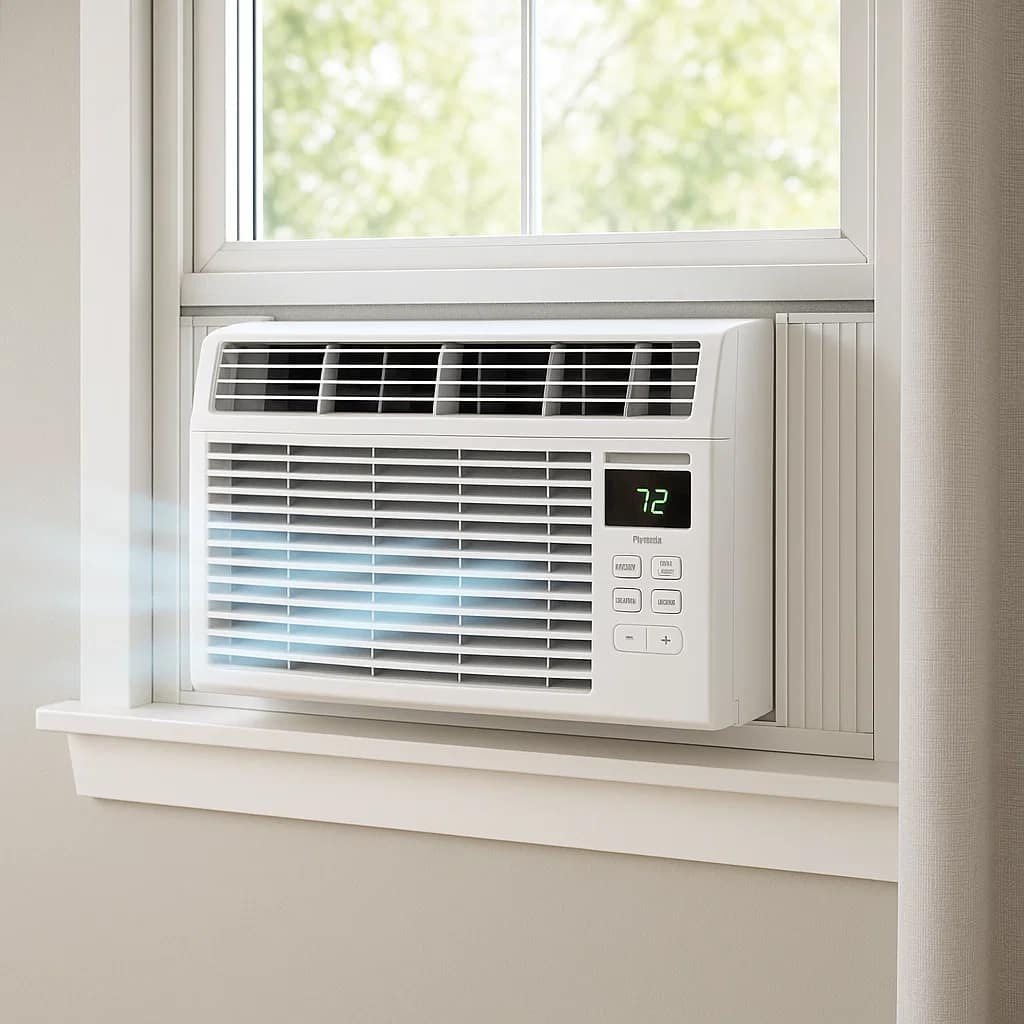
Plug the unit into a dedicated grounded outlet (never use extension cords with AC units). Turn the unit to its highest cooling setting and verify cool air output within 5 to 10 minutes. Check for unusual vibrations, rattling, or water pooling inside. Make final adjustments to the unit’s angle if drainage issues occur.
Walk outside and verify the unit sits securely with no excessive overhang. The outdoor portion should have adequate airflow clearance—at least 20 inches from walls or obstructions.
For apartment dwellers concerned about installation regulations, explore our guide on common appliance problems and prevention strategies to avoid issues that might affect your lease agreement.
Sliding windows and installations without traditional side panels require modified approaches, but they’re entirely feasible with the right techniques.
For side-to-side sliding windows, you’ll need to create a custom mounting board. Measure the vertical opening when your window slides fully to one side. Cut a piece of 3/4-inch plywood to fill this space, with a centered opening matching your AC unit’s dimensions. Secure the board in the window opening using L-brackets attached to the window frame.
Install your AC unit in the plywood opening, sealing all edges with weatherstripping. This method provides exceptional stability and insulation superior to standard side panel installations. The plywood should be painted or sealed with exterior-grade polyurethane to prevent weather damage.
When side panels are broken, lost, or incompatible with your window type, create replacement panels using 1/4-inch plexiglass or rigid foam insulation board. Measure the gap between your AC unit and the window frame, adding 1 inch to ensure overlap. Cut the material to size and secure it using weatherproof tape, brackets, or a wooden frame.
Alternative solutions include purchasing universal side panel kits designed for multiple unit sizes. These adjustable panels typically accommodate windows between 24 and 40 inches wide and cost $20 to $35 at home improvement stores.
Some apartments feature permanent wall sleeves designed for air conditioners. These through-wall installations eliminate window restrictions but require specific sleeve-compatible units. Measure the sleeve opening precisely (height, width, and depth), ensuring your new unit matches these dimensions. Sleeve installations typically provide better insulation and allow normal window use.
Follow manufacturer instructions for securing units in wall sleeves, as methods vary significantly by brand. Most require metal brackets that attach to the sleeve’s interior frame rather than relying on window support.
Learning from others’ errors prevents costly repairs and safety hazards. These seven mistakes occur in approximately 40% of DIY installations but are completely avoidable with proper knowledge.
Window AC units require dedicated circuits for models exceeding 7,500 BTU. Running high-capacity units on shared circuits causes breaker trips, voltage drops, and potential fire hazards. Check your unit’s amp rating and verify your circuit can handle the load. If uncertain, consult an electrician before installation. Never use extension cords—they create resistance that reduces efficiency and poses fire risks.
Installing your AC perfectly level or tilting it forward causes condensation to accumulate inside rather than draining outdoors. This water pooling leads to mold growth, water damage, and unit failure. The correct installation angle is 1/4 inch of backward tilt over 12 inches, verified using your level during Step 3.
The most common efficiency killer is insufficient gap sealing. Every unsealed opening allows hot, humid air to enter while cool air escapes. Homeowners who meticulously seal all gaps report 20% to 25% lower cooling costs compared to those who skip this crucial step. Use quality foam weatherstripping, not cheaper felt alternatives that compress and fail within weeks.
Window air conditioners weighing 80 to 120 pounds stress window frames not designed for this load. Older windows with rotted wood or loose joints can fail catastrophically, dropping the unit and causing injuries or property damage. Always inspect your window’s structural integrity and reinforce weak points before installation.
Positioning furniture, curtains, or storage within 20 inches of your AC unit restricts airflow, forcing the compressor to work harder and reducing cooling capacity by up to 30%. Maintain clearance around both the indoor and outdoor portions of your unit for optimal performance.
The window lock prevents the sash from being lifted, which would compromise your installation and create a security vulnerability. This small component plays a critical role in maintaining proper operation and preventing break-ins. Always install the provided lock or purchase an aftermarket solution.
Units installed on sun-exposed walls work significantly harder to cool your space, consuming 10% more energy according to cooling efficiency studies. If possible, choose north or east-facing windows for installation. When south or west windows are your only option, consider installing an exterior awning or shade to reduce heat load.
Proper installation represents only the first step toward optimal cooling performance. These post-installation strategies enhance efficiency, reduce operating costs, and extend your unit’s lifespan.
Set your AC thermostat to 78°F when home and 85°F when away. This balance maintains comfort while avoiding excessive energy consumption. Contrary to popular belief, leaving your AC running at a higher temperature when you’re out costs less than turning it off and forcing it to cool a hot house from scratch.
Use the “energy saver” or “eco” mode if your unit includes this feature. These modes cycle the fan intermittently rather than continuously, reducing electricity consumption by 10% to 15% without significantly impacting comfort.
Clean or replace your AC filter every 2 to 4 weeks during peak usage. Clogged filters restrict airflow, forcing your compressor to work harder and consuming 15% more energy. Most window units feature washable filters—rinse with warm water and mild soap, then air dry completely before reinstalling.
Inspect and clean the exterior coils monthly, removing leaves, dirt, and debris that impede heat exchange. Vacuum the front intake grille weekly to prevent dust accumulation.
Close curtains or blinds on sun-exposed windows to reduce heat gain. Use ceiling fans to circulate cool air throughout your space—this allows you to set your thermostat 3 to 4 degrees higher without sacrificing comfort. Seal any drafts around doors and windows in the cooled room to prevent treated air from escaping.
Consider using your AC unit to cool a central area, then using fans to distribute air to adjacent rooms rather than installing multiple units. This central cooling approach often proves more economical for smaller homes and apartments.
For comprehensive strategies on maintaining all your home appliances for optimal performance and longevity, review our complete appliance maintenance guide.
Sarah Martinez, a homeowner in Phoenix, Arizona, faced a common challenge: her 1950s home featured narrow windows incompatible with modern AC units. Professional quotes for custom installation exceeded $650, prompting her to explore DIY solutions.
Sarah’s installation challenge centered on 28-inch-wide windows with damaged side panels from her previous unit. Following the custom side panel construction method detailed in this guide, she fabricated replacement panels using 1/4-inch plexiglass purchased for $18. She measured precisely, created templates, and cut the panels with a scoring tool.
The installation process took 3.5 hours from start to finish, including weatherproofing and testing. Sarah documented her pre-installation cooling costs averaging $187 monthly during Arizona’s brutal summer. Post-installation monitoring over two months showed remarkable results: her monthly cooling costs decreased to $142, representing a 24% reduction in energy consumption.
The efficiency gains stemmed from meticulous gap sealing and proper unit angle adjustment—two factors often overlooked in rushed installations. Sarah’s total DIY costs amounted to $83 including tools, plexiglass, weatherstripping, and mounting hardware, compared to the quoted $650 professional installation fee.
Beyond the financial benefits, Sarah reported improved cooling distribution throughout her 1,200-square-foot home and quieter operation due to the vibration-dampening pads she installed. Her unit has operated flawlessly for two consecutive summers, validating the DIY approach when proper techniques are followed. Her experience demonstrates that with patience, correct materials, and attention to detail, homeowners can achieve professional-grade installation results while saving substantially on labor costs.
While most window AC installations suit DIY capabilities, certain circumstances warrant professional assistance. Recognizing these situations protects your safety, prevents property damage, and ensures code compliance.
If your home lacks properly grounded outlets or requires circuit upgrades to support your AC unit’s electrical demands, hire a licensed electrician. Electrical work performed incorrectly poses serious fire and electrocution risks. Professional electricians ensure installations meet National Electrical Code standards and pass local inspections.
Installing through-wall sleeves, reinforcing damaged window frames, or mounting units above ground-floor windows typically requires structural modifications beyond DIY scope. These projects involve load-bearing considerations, exterior weatherproofing, and potentially building permits.
Many apartment buildings prohibit personal AC installations or mandate professional installation for liability reasons. Violating these rules may result in lease termination or removal fees exceeding $200. Always review your lease agreement and consult property management before proceeding.
Window AC units weighing 80 to 120 pounds present fall hazards during installation. If you cannot safely lift and maneuver this weight with assistance, professional installation prevents injuries. Similarly, installing units on second or third floors increases fall risks—hire professionals equipped with proper safety equipment.
Professional installation typically costs $150 to $300 for straightforward projects, while complex installations requiring electrical work or structural modifications may exceed $500. Compare these costs against your DIY capabilities and available assistance before deciding. For issues related to improper appliance installation that may impact your home’s electrical system, read our article on how faulty appliances lead to high electricity bills.
Installing a window air conditioner transforms your living space from unbearably hot to comfortably cool, all while saving hundreds of dollars compared to professional installation fees. By following this seven-step method—from precise window measurements to thorough weatherproofing—you’ll achieve professional-grade results that maximize cooling efficiency and minimize energy costs.
Remember the three critical success factors: accurate measurements prevent costly unit returns, proper backward tilt ensures condensation drains correctly, and meticulous gap sealing reduces energy waste by up to 25%. Whether you’re installing in a standard double-hung window, adapting for sliding windows without side panels, or creating custom solutions for unique situations, these proven techniques deliver reliable, long-lasting results.
Your newly installed window AC will provide years of dependable cooling when maintained properly. Clean filters regularly, inspect weatherstripping annually, and follow the efficiency-maximizing strategies outlined above. With your installation complete, you’re now equipped to enjoy comfortable indoor temperatures throughout the hottest months while keeping your energy bills manageable and your home properly protected.
Window AC units work by extracting warm air from your interior space, removing heat and moisture through refrigerant-filled coils, and expelling the heat outdoors while returning cooled, dehumidified air inside. The compressor, located in the outdoor portion, circulates refrigerant between the evaporator coils (indoor) and condenser coils (outdoor). As warm room air passes over the cold evaporator coils, heat transfers to the refrigerant, cooling the air. The condensed moisture drains outside, while the refrigerant carries absorbed heat to the outdoor coils where it’s released into the atmosphere.
Yes, window AC units can be installed in wall sleeves, but you must verify compatibility. Standard window units designed for through-wall installation will specify this capability. The sleeve must match the unit’s dimensions precisely, and proper sealing prevents air leakage and water infiltration. Wall sleeve installations often provide superior insulation compared to window installations and allow normal window use. However, creating a new wall sleeve typically requires professional installation involving structural modifications, electrical work, and exterior weatherproofing that exceed typical DIY project scope.
Installing without side panels requires creating custom gap-filling solutions using rigid foam insulation board or plexiglass cut to fit the spaces between your AC unit and window frame. Measure the gap dimensions carefully, adding 1 inch for overlap. Cut your material using a utility knife (foam board) or scoring tool (plexiglass). Secure the panels using weatherproof tape, L-brackets, or wooden frames attached to the window frame. Seal all edges with foam weatherstripping to prevent air leakage. Alternatively, purchase universal side panel kits designed to accommodate various window widths—these adjustable solutions cost $20 to $35 at home improvement stores.
Standard window air conditioners require window openings between 23 and 36 inches wide, though exact requirements vary by model and BTU capacity. Measure your window width from inside jamb to inside jamb at the narrowest point. Check the manufacturer’s specifications for minimum and maximum window width—your window must fall within this range. Most 5,000 to 8,000 BTU units accommodate windows as narrow as 23 inches, while larger 12,000+ BTU units may require 30 to 36 inches minimum. Window height should allow at least 13 to 15 inches when the sash is fully raised, though many units adjust to fit various heights.
You should not attempt to add refrigerant (freon) to a window air conditioner yourself. Refrigerant systems are sealed units requiring EPA certification and specialized equipment to service properly. If your AC unit isn’t cooling effectively, the issue rarely involves refrigerant loss—sealed systems don’t lose refrigerant under normal operation. Instead, check for dirty filters, blocked coils, or improper installation angle. Low cooling performance typically stems from maintenance issues rather than refrigerant depletion. If you’ve addressed common causes and cooling remains inadequate, contact a certified HVAC technician who can properly diagnose refrigerant leaks and perform EPA-compliant repairs.
Avoid these seven critical mistakes: installing without checking electrical circuit capacity (causing breaker trips), improper unit angle that prevents drainage (leading to water damage), inadequate gap sealing (reducing efficiency by 25%), overloading weak window frames (risking unit falls), blocking airflow with furniture or curtains (cutting capacity by 30%), skipping window lock installation (compromising security), and installing in direct sunlight without shade protection (increasing energy consumption by 10%). Additionally, never use extension cords with AC units and always verify your unit tilts slightly backward for proper condensation drainage. Following proper installation procedures prevents these common issues.
First-time installations typically take 2 to 4 hours depending on window type and your experience level. Standard double-hung windows represent the easiest installations, averaging 90 minutes to 2 hours. Sliding windows requiring custom side panels may take 3 to 4 hours including material preparation. The installation process moves faster when you’ve gathered all tools and materials beforehand and have assistance lifting the unit into position. Experienced installers working on standard windows can complete the job in 45 to 60 minutes. Budget extra time for thorough weatherproofing and testing—rushing through these steps compromises efficiency and performance.
Essential tools include a measuring tape, level, screwdriver set (Phillips and flathead), power drill with bits, utility knife, and safety equipment (gloves and glasses). You’ll also need the unit’s mounting bracket, side panels or custom gap-filling materials, weatherstripping foam, L-brackets, wood screws, and a window lock. Optional but helpful items include an AC installation kit for your window type, exterior silicone caulk, anti-vibration pads, and if needed, materials for custom side panels such as plexiglass or foam board. Total cost for tools and materials ranges from $25 to $75, representing significant savings compared to $150 to $500 professional installation fees.