How to Fix E1 Error in Washing Machine: Complete Guide for All Brands

Table Of Contents

The Problem: E1 Error Disrupting Your Laundry Day

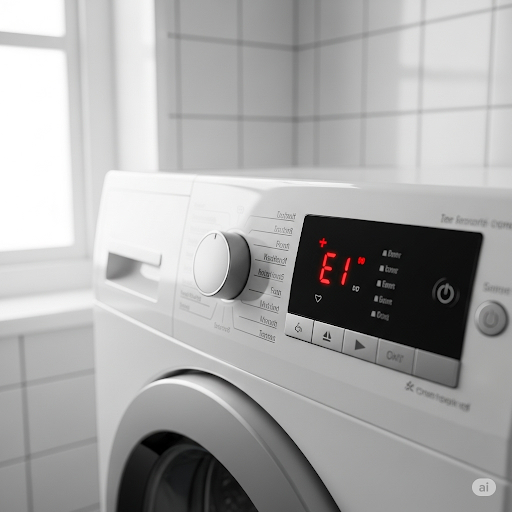
Picture this: You’re rushing to get your laundry done before an important meeting, and suddenly your washing machine displays the dreaded “E1” error code. Your clothes are soaking wet, the cycle has stopped, and you’re left wondering what went wrong. This frustrating scenario affects thousands of households daily, turning a simple chore into a major headache.

The consequences of ignoring this error can be costly – from damaged clothes and potential water damage to expensive repair bills. But here’s the good news: most E1 errors can be resolved quickly with the right knowledge and approach.

This comprehensive guide will walk you through everything you need to know about fixing E1 errors across all major washing machine brands, saving you time, money, and unnecessary stress.


What Does E1 Error Mean in Washing Machines?

The E1 error code is one of the most common washing machine error codes, but its meaning can vary depending on your machine’s brand and model. Understanding what this error signifies is the first step toward resolving it effectively.
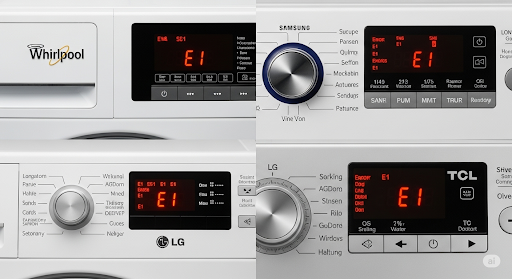
Universal E1 Error Meanings:

BrandE1 Error MeaningPrimary Cause
WhirlpoolWater supply issueSlow water filling
SamsungWater supply errorInsufficient water pressure
LGWater level sensor problemSensor malfunction
TCLSlow water fillingWater supply blockage
MideaWater inlet errorClogged inlet valve
SharpWater supply faultTap/valve issues
ToshibaWater filling problemHose blockage

Key Insight: While E1 generally relates to water supply issues, the specific cause varies by manufacturer. This is why a one-size-fits-all approach often fails.


Common Causes of E1 Error in Washing Machines

Before diving into solutions, let’s identify the root causes behind this error. Understanding these will help you diagnose the problem more accurately.

1. Water Supply Issues (80% of cases)

  • Closed or partially closed water taps
  • Low water pressure in your home’s plumbing system
  • Kinked or blocked inlet hoses
  • Clogged water inlet screens/filters

2. Sensor and Electronic Problems (15% of cases)

  • Faulty water level sensor
  • Damaged pressure switch
  • Loose electrical connections
  • Control board malfunctions

3. Mechanical Blockages (5% of cases)

  • Debris in inlet valves
  • Frozen pipes (in cold climates)
  • Damaged inlet valve solenoids

Pro Tip: Start with the simplest solutions first – many E1 errors are resolved by basic troubleshooting steps that take less than 5 minutes.


Step-by-Step Solutions to Fix E1 Error

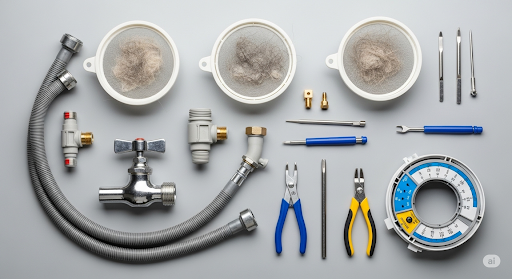
Follow these systematic troubleshooting steps to resolve your washing machine’s E1 error. Each step builds upon the previous one, starting with the most common and easily fixable causes.

Step 1: Check Water Supply Basics ⚡

Time Required: 2-3 minutes

  1. Verify water taps are fully open
    • Turn both hot and cold water taps counterclockwise until fully open
    • Listen for water flow when taps are opened
  2. Test water pressure
    • Turn on a nearby faucet to check if water pressure is adequate
    • If pressure is low throughout your home, contact your water utility company
  3. Inspect for obvious leaks
    • Look around the washing machine area for water puddles
    • Check connections behind the machine

Success Indicator: If water flows freely from nearby taps and no leaks are visible, proceed to Step 2.

Step 2: Examine Inlet Hoses 🔧

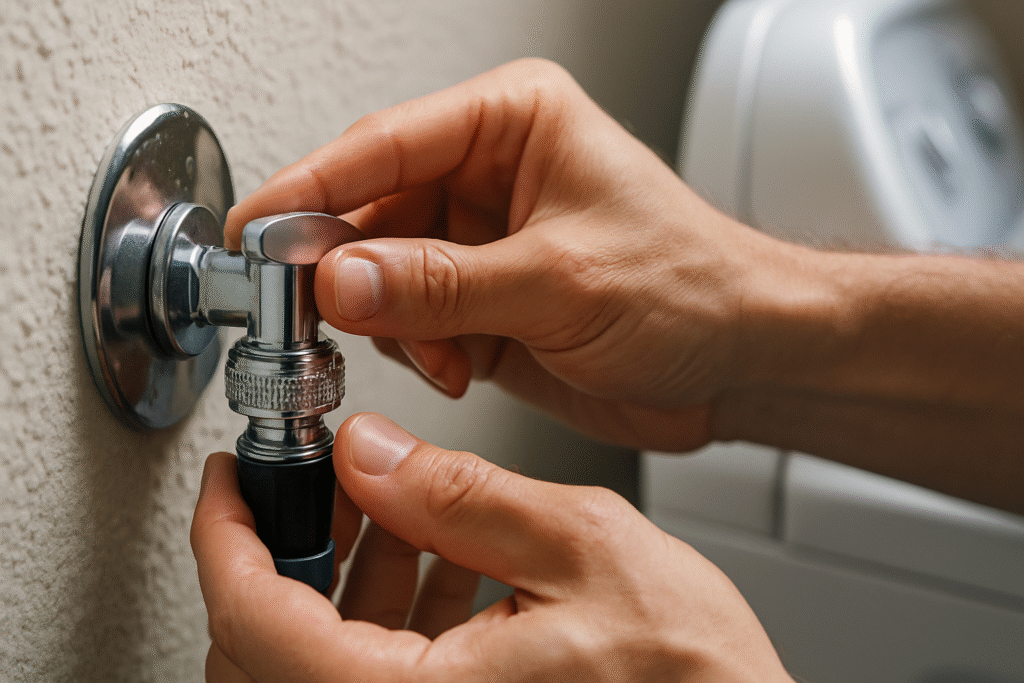
Time Required: 5-7 minutes

  1. Turn off water supply and unplug the machine
  2. Pull the washing machine away from the wall (you’ll need access to the back)
  3. Inspect inlet hoses for:
    • Kinks or sharp bends
    • Visible damage or cracks
    • Proper connection to both machine and wall outlets
  4. Remove and clean inlet hose screens:
    • Carefully unscrew hoses from the machine
    • Use needle-nose pliers to remove small mesh screens
    • Rinse screens under running water
    • Use an old toothbrush to remove stubborn debris

Important Safety Note: Always turn off water supply before disconnecting hoses to prevent flooding.

Step 3: Clean Water Inlet Filters 🧽

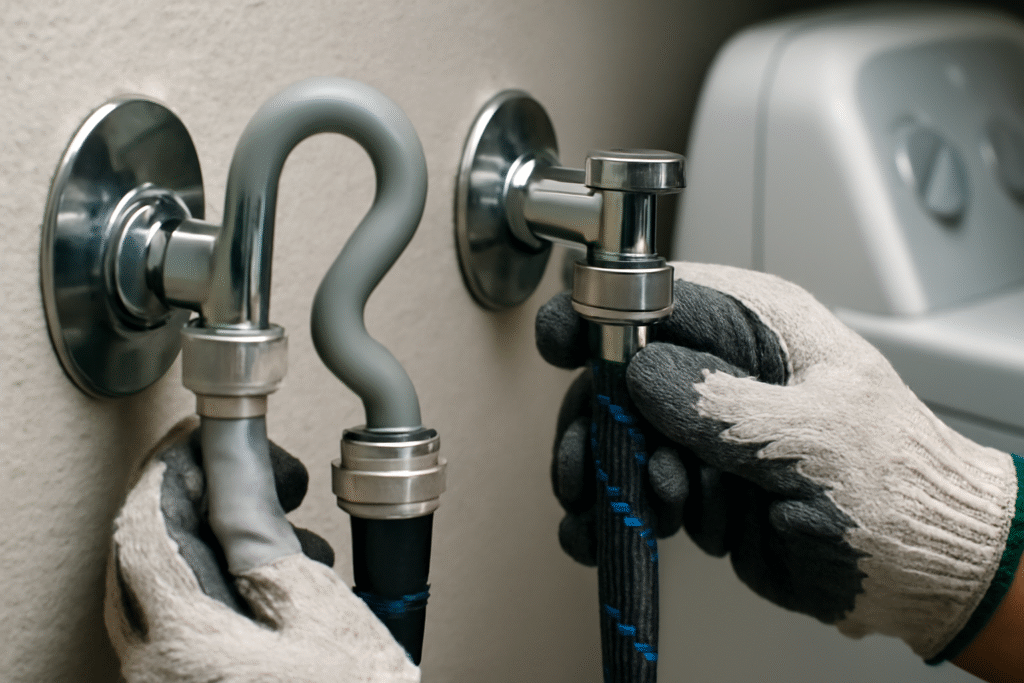
Time Required: 10-15 minutes

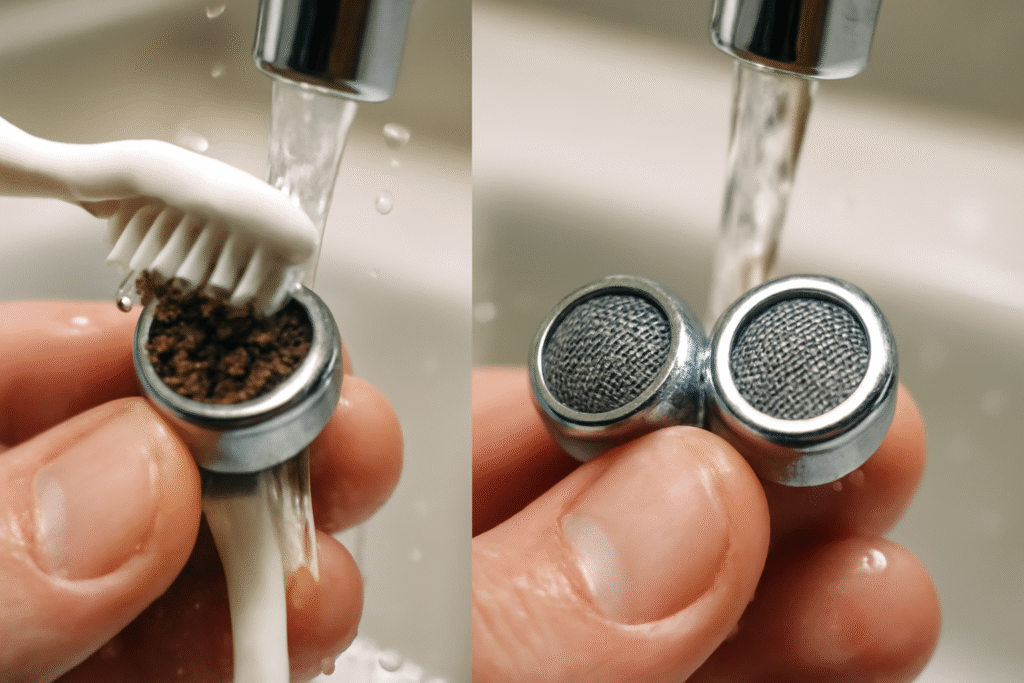
Most washing machines have additional filters that can become clogged over time:

  1. Locate the inlet valve (usually at the back of the machine where hoses connect)
  2. Remove inlet valve filters:
    • These are small cylindrical screens inside the valve
    • Gently pull them out with pliers
    • Soak in warm water for 10 minutes
    • Scrub gently with a soft brush
  3. Check for mineral buildup
    • White, chalky deposits indicate hard water issues
    • Use white vinegar to dissolve mineral deposits
    • Rinse thoroughly before reinstalling

Step 4: Test Water Level Sensor 📊

Time Required: 5-8 minutes

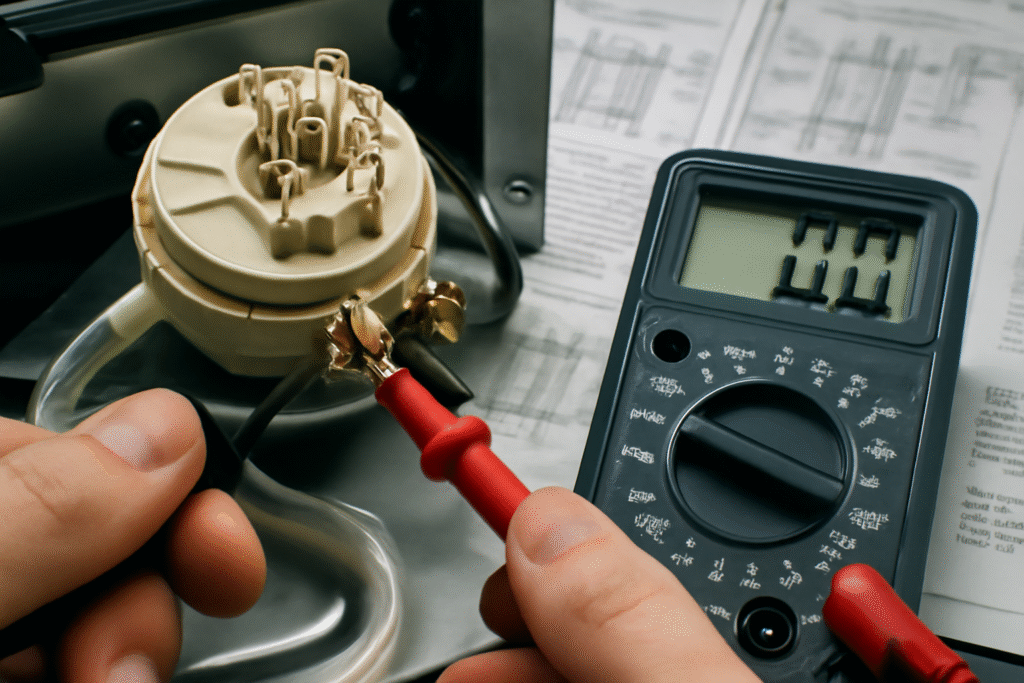
If water supply issues aren’t the culprit, the problem might be with your machine’s sensors:

  1. Start an empty wash cycle and observe the water filling process
  2. Listen for unusual sounds:
    • Grinding or clicking from the control panel
    • Unusual humming from the water inlet area
  3. Check error code timing:
    • Does E1 appear immediately when starting?
    • Does it show after attempting to fill for several minutes?

Diagnostic Clue: If E1 appears immediately, it’s likely a sensor issue. If it appears after several minutes of attempted filling, it’s probably a water supply problem.

Step 5: Reset the Washing Machine 🔄

Time Required: 3-5 minutes

Sometimes, a simple reset can clear temporary electronic glitches:

  1. Unplug the washing machine from the power outlet
  2. Wait 60 seconds (this allows capacitors to discharge)
  3. Plug back in and restart
  4. Run a test cycle to see if the error persists

Success Rate: This method resolves approximately 20% of E1 errors, particularly those caused by temporary electronic hiccups.


Brand-Specific E1 Error Solutions

Different manufacturers implement unique systems, requiring tailored approaches for optimal results.

Whirlpool Washing Machines

Specific Issue: E1 typically indicates the washer is taking too long to fill with water.

Whirlpool-Specific Steps:

  1. Check if you’re using HE (High Efficiency) detergent – regular detergent can cause sensor confusion
  2. Verify the load size setting matches your actual load
  3. Clean the automatic load sensing system by running an empty hot water cycle with 2 cups of white vinegar

Model-Specific Note: Whirlpool Cabrio models may require a different reset sequence – hold the “Start” button for 3 seconds while the lid is closed.

Samsung Washing Machines

Specific Issue: E1 indicates insufficient water supply or pressure.

Samsung-Specific Steps:

  1. Access diagnostic mode by pressing “Temp” and “Delay End” simultaneously for 3 seconds
  2. Run diagnostic test “dC” to check water supply function
  3. For front-loading models, ensure the door is properly sealed – a poor seal can trigger false E1 errors

Pro Tip: Samsung machines are particularly sensitive to water pressure fluctuations. If your home has variable pressure, consider installing a pressure regulator.

LG Washing Machines

Specific Issue: E1 often relates to the water level sensor rather than actual water supply.

LG-Specific Steps:

  1. Calibrate the load sensor by running an empty “Tub Clean” cycle
  2. Check the pressure tube connected to the water level sensor (located behind the control panel)
  3. For IE error (similar to E1), ensure the drain hose isn’t inserted too far into the drain pipe

Technical Note: LG machines use advanced load sensing technology that can be disrupted by uneven loads or sensor contamination.

TCL and Midea Washing Machines

Specific Issue: E1 typically means water is filling too slowly.

TCL/Midea-Specific Steps:

  1. Check the water temperature selection – some models restrict flow on certain temperature settings
  2. Inspect the internal water filter (usually accessible from the front bottom panel)
  3. Verify installation leveling – unlevel machines can trigger false sensor readings

Advanced Troubleshooting Techniques

When basic steps don’t resolve the issue, these advanced techniques can help identify deeper problems.

Electrical Connection Diagnosis

Warning: Only attempt if you’re comfortable with basic electrical work, or call a professional.

  1. Check wiring harness connections at the water inlet valve
  2. Test inlet valve solenoids with a multimeter (should read 500-1500 ohms)
  3. Inspect control board for visible signs of damage or corrosion

Water Pressure Testing

Use a water pressure gauge (available at hardware stores) to measure:

  • Minimum required pressure: 20 PSI
  • Optimal pressure range: 30-100 PSI
  • Maximum safe pressure: 120 PSI

If pressure is consistently below 20 PSI, contact a plumber to address your home’s water pressure issues.


Prevention Tips: Avoiding Future E1 Errors

Proactive maintenance is always more cost-effective than reactive repairs. Follow these tips to minimize E1 error occurrences:

Monthly Maintenance Checklist

  • Clean inlet hose screens during your regular cleaning routine
  • Run a cleaning cycle with washing machine cleaner or white vinegar
  • Check water supply connections for leaks or corrosion
  • Inspect hoses for wear, cracks, or kinks

Quarterly Deep Maintenance

  • Replace inlet hoses every 5 years or sooner if damaged
  • Service water softener system if you have hard water
  • Professional inspection of internal sensors and electronics

Environmental Considerations

  • Protect from freezing in cold climates – frozen pipes are a common E1 cause
  • Maintain consistent water pressure – consider a pressure regulator if you experience fluctuations
  • Use appropriate detergent – HE machines require HE detergent to function properly

Money-Saving Tip: Regular maintenance costs approximately $30-50 annually but can prevent repair bills ranging from $150-400.


When to Call a Professional Technician

While many E1 errors can be resolved through DIY troubleshooting, certain situations require professional expertise:

Call a Professional If:

  • Multiple error codes appear simultaneously
  • E1 persists after completing all troubleshooting steps
  • Water inlet valve replacement is needed (complex installation)
  • Control board issues are suspected
  • You’re uncomfortable performing any of the suggested steps

Questions to Ask Your Technician:

  1. “What specifically caused the E1 error in my machine?”
  2. “Are there any other components that should be inspected?”
  3. “What’s the expected lifespan of the repaired parts?”
  4. “How can I prevent this issue in the future?”

Cost Expectations:

  • Service call: $75-150
  • Inlet valve replacement: $150-250
  • Sensor replacement: $200-300
  • Control board replacement: $300-500

Frequently Asked Questions About E1 Errors

Can I use my washing machine with an E1 error showing?

No, continuing to use the machine with an E1 error can cause additional damage to internal components. Address the error before using the machine again.

How long should I wait before calling a technician?

Try basic troubleshooting steps first. If the error persists after following this guide’s steps, contact a professional within 24-48 hours to prevent potential water damage.

Will hard water cause more frequent E1 errors?

Yes, hard water causes mineral buildup in screens and valves, leading to more frequent E1 errors. Consider installing a water softener system if you have consistently hard water.

Is it safe to reset my washing machine multiple times?

Occasional resets are safe, but frequent resets indicate an underlying problem that needs professional attention.

Can weather affect E1 errors?

Yes, extremely cold weather can cause pipes to freeze, leading to E1 errors. Hot weather can affect water pressure in some municipal systems.

How do I know if my water pressure is adequate?

Install a water pressure gauge on an outdoor spigot. Readings below 20 PSI will likely cause E1 errors in most washing machines.


Conclusion: Take Control of Your E1 Error

The E1 error in washing machines, while frustrating, is typically a solvable problem that doesn’t require expensive professional repairs. By following this comprehensive guide, you now have the knowledge and tools to:

  • Quickly diagnose the root cause of your E1 error
  • Implement effective solutions for all major washing machine brands
  • Prevent future occurrences through proper maintenance
  • Make informed decisions about when to seek professional help

Remember: Start with the simplest solutions first – checking water supply and cleaning inlet screens resolves over 70% of E1 errors. If these steps don’t work, progress through the more advanced troubleshooting techniques.

Your next step: Begin with Step 1 of our troubleshooting guide right now. Most E1 errors can be resolved within 15-30 minutes, getting your laundry routine back on track quickly.

Have you successfully fixed your E1 error using this guide? Share your experience in the comments below to help other readers facing similar issues.


This guide is regularly updated to include the latest troubleshooting techniques and brand-specific solutions. Bookmark this page for future reference and share it with others who might benefit from this comprehensive E1 error solution guide.

    Categories

    About Appliquix

    Appliquix connects you with certified local appliance repair technicians across the US, Canada, Australia, and Europe. Fast, reliable, and affordable appliance repairs at your doorstep

    follow us on social media

    newsletter signup

    Get expert appliance tips, maintenance guides, and exclusive repair discounts delivered to your inbox
    Appliquix connects you with certified local appliance repair technicians across the US, Canada, Australia, and Europe. Fast, reliable, and affordable appliance repairs at your doorstep

    Contact info

    Copyright © 2025 appliquix. all rights reserved.